DiyReact的功能 React的核心点:
组件(Component) Virtual Dom JSX Props & State 核心的渲染的Api:
1 ReactDOM .render (element, container[, callback])
在不考虑性能,调试,扩展性的情况下,实现上面React的核心功能,相同Api,仅仅只需要几百行的代码。在此过程中,能真正的去理解其中的关键概念。
Element,Component,Dom 下面是React最简单的写法:
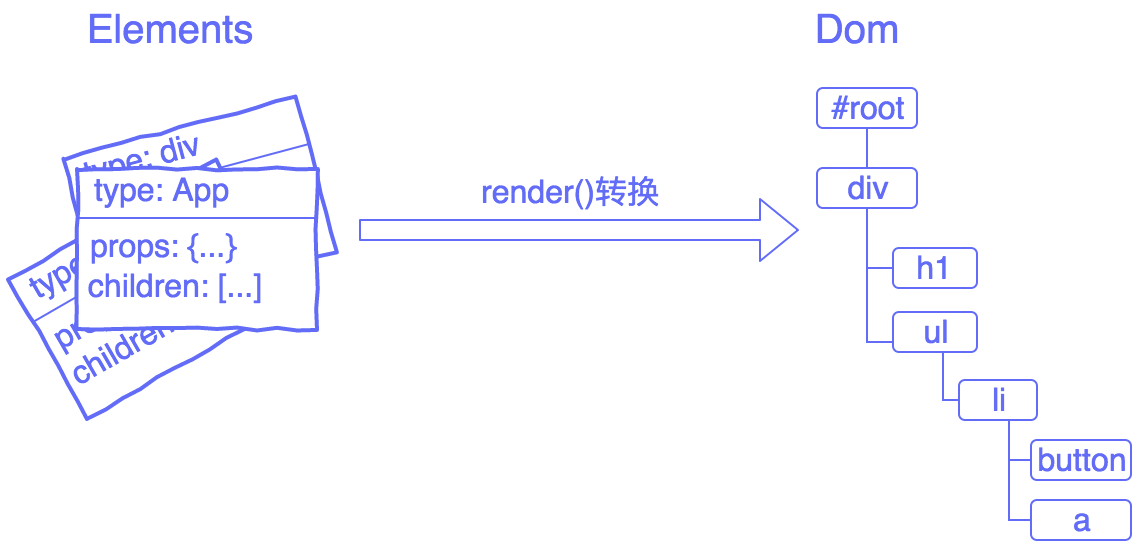
1 2 3 4 5 6 7 8 const element = { type : "div" , props : { id : "foo" } }; diyreact.render (element, document .getElementById ("root" ));
在此demo中,就是把element转化为dom显示出来。在React里,我们不直接操作Dom元素,我们操作的是Dom的抽象层即Element。
Elements Describe the Tree
An element is a plain object describing a component instance or DOM node and its desired properties.
即通过Element用来表示组件与Dom结点及他们的属性,整体构成一个树型结构,DiyReact.Element的定义非常的简单,如下所示:
1
2
3
4
5
6
7
8
{ type : "" , props : { children :[ ], xxx : xxx } }
如下面的Element:
1
2
3
4
5
6
7
8
9
10
11
const element = { type : "div" , props : { id : "container" , children : [ { type : "input" , props : { value : "foo" , type : "text" } }, { type : "a" , props : { href : "/bar" } }, { type : "span" , props : {} } ] } };
其所描述的Dom:
1 2 3 4 5 <div id ="container" > <input value ="foo" type ="text" > <a href ="/bar" > </a > <span > </span > </div >
1
2
3
4
5
6
7
8
9
10
11
12
13
14
15
16
17
18
19
20
21
22
23
24
25
26
27
28
29
export function render (element, parentDom ) { const {type, props} = element; const isTextElement = type === "TEXT ELEMENT" ; const dom = isTextElement ? document .createTextNode ("" ) : document .createElement (type); const isListener = name => name.startsWith ("on" ); Object .keys (props).filter (isListener).forEach (name => const eventType = name.toLowerCase ().substring (2 ); dom.addEventListener (eventType, props[name]); }); const isAttribute = name => !isListener (name) && name != "children" ; Object .keys (props).filter (isAttribute).forEach (name => dom[name] = props[name]; }); const childElements = props.children || []; childElements.forEach (childElement =>render (childElement, dom)); parentDom.appendChild (dom); }
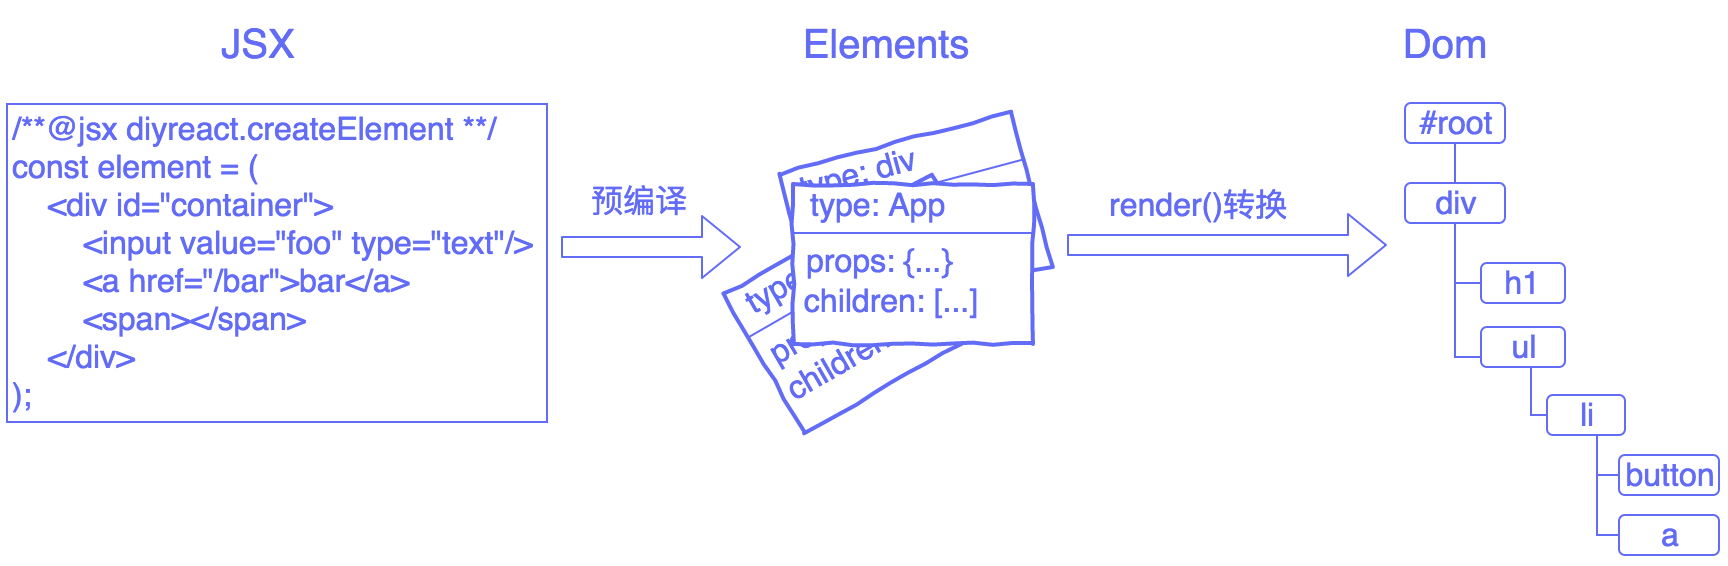
createElement与JSX 直接使用Element来描述Dom元素,其可读性很差,如下所示:
1
2
3
4
5
6
7
8
9
10
11
const element = { type : "div" , props : { id : "container" , children : [ { type : "input" , props : { value : "foo" , type : "text" } }, { type : "a" , props : { href : "/bar" children : [{ type : "TEXT ELEMENT" , props : { nodeValue : "bar" } }]} }, { type : "span" , props : {} } ] } };
而使用JSX来表示的话,可读性就能提升很多,如下所示:
1 2 3 4 5 6 7 8 const element = ( <div id ="container" > <input value ="foo" type ="text" /> <a href ="/bar" > bar</a > <span > </span > </div > );
以上的JSX语法,浏览器无法识别,需要通过babel进行预处理,通过babel的插件transform-react-jsx把JSX转换为如下代码:
1 2 3 4 5 6 7 8 9 10 11 12 13 const element = diyreact.createElement ( "div" , { id : "container" }, diyreact.createElement ("input" , { value : "foo" , type : "text" }), diyreact.createElement ( "a" , { href : "/bar" }, "bar" ), diyreact.createElement ("span" , null ) );
增加JSX后的整体流程如下所示:
对应的createElement代码,非常简单:
1
2
3
4
5
6
7
8
9
10
11
12
13
14
15
16
const TEXT_ELEMENT = "TEXT ELEMENT" ;export function createElement (type, config, ...args ) { const props = Object .assign ({}, config); const hasChildren = args.length > 0 ; const rawChildren = hasChildren ? [].concat (...args) : []; props.children = rawChildren .filter (c =>null && c !== false ) .map (c =>instanceof Object ? c : createTextElement (c)); return { type, props }; } function createTextElement (value ) { return createElement (TEXT_ELEMENT , { nodeValue : value }); }
babel的插件transform-react-jsx的做的非常通用,通用注解,可以修改默认的React.createElement函数,可以通过babel-online 测试
// TODO-ly render()每次都是从root结点开始进行对比,setState()是从哪个当前这个结点开始,但整体逻辑是一样的
Component React.render()函数里的element的范围很广,可以是Object,Function,Component,但只有Component才会有相应的lifecycle, states等等。
1
2
3
4
5
6
7
8
9
10
class Component { constructor (props ) { this .props = props; this .state = this .state || {}; } setState (partialState ) { } }
更多细节大家可以查看:Didact: Components and State
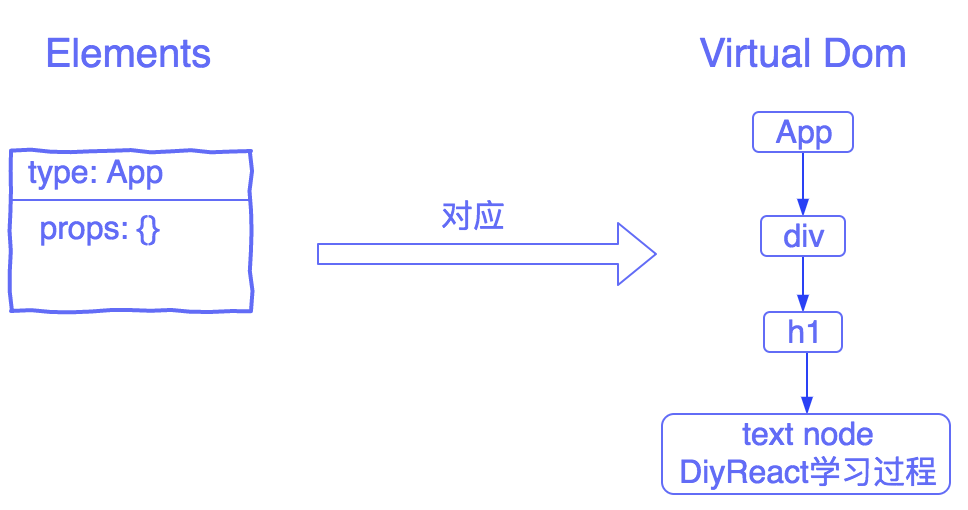
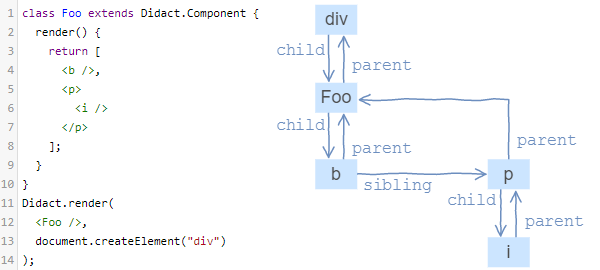
1 2 3 4 5 6 7 8 9 10 11 class App extends diyreact.Component { render ( return ( <div > <h1 > DiyReact的学习过程</h1 > </div > ); } } diyreact.render (<App /> document .getElementById ("root" ));
其把JSX转换后的代码:
1 2 3 4 5 6 7 8 9 10 11 12 13 14 15 class App extends diyreact.Component { render ( return diyreact.createElement ( "div" , null , diyreact.createElement ( "h1" , null , "DiyReact\u7684\u5B66\u4E60\u8FC7\u7A0B" ) ); } } diyreact.render (diyreact.createElement (App , null ), document .getElementById ("root" ));
其对应的Element Tree与Virtual Dom Tree:
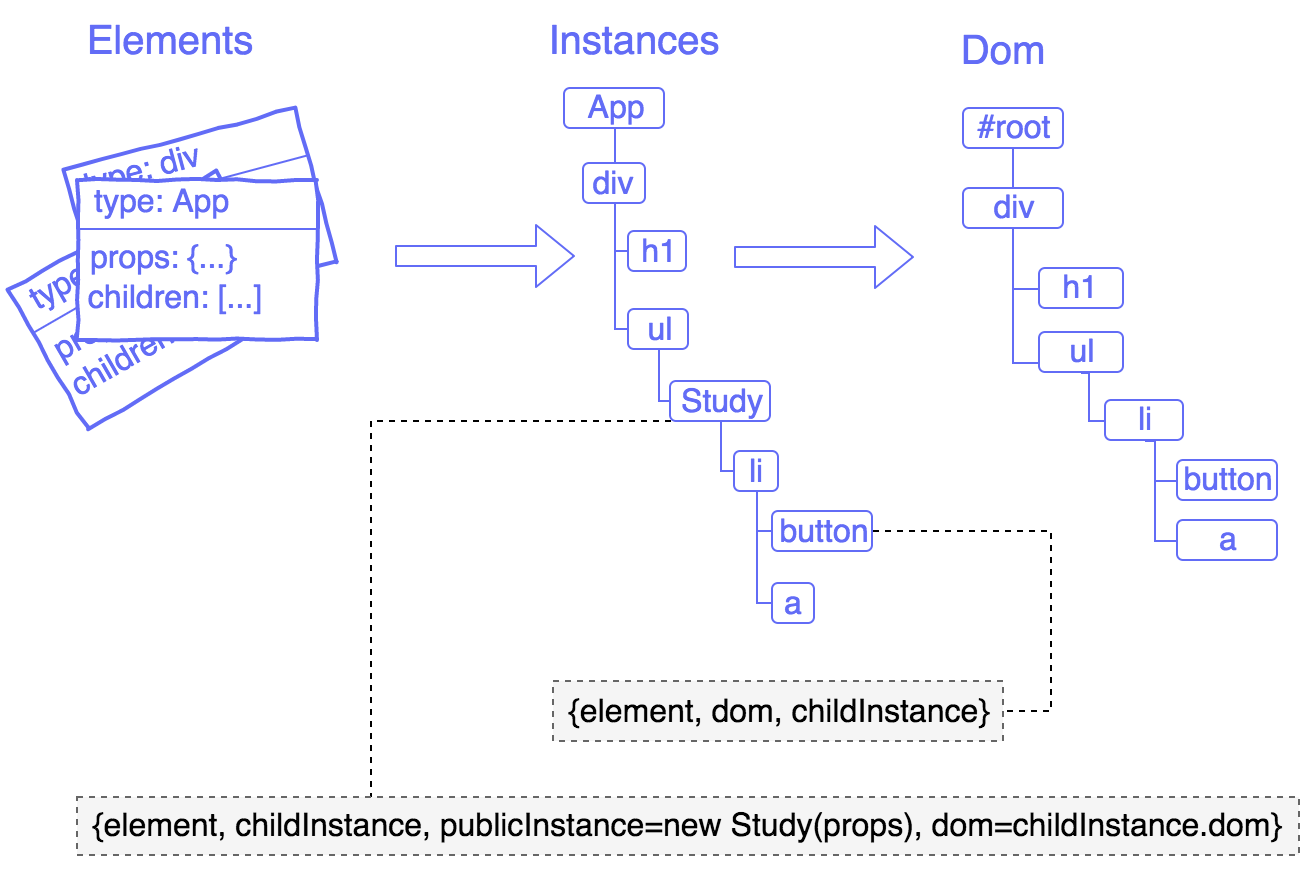
Instance,reconciliation与Virtual Dom 上述的render()函数,把element转为Dom元素,每次调用render()函数时,都会创建全新的dom元素,即使用element完全一致,都不会进行复用。如下所示:
1
2
3
const element = <div > Foo</div > render (element, document .getElementById ("root" ));render (element, document .getElementById ("root" ));
在React里,求两个Elements Tree的过程称为”reconciliation“,为了复用与对比,我们需要保存一个与之对应的对象树:A Virtual Dom。
这个Virtual Dom的”nodes”应该是什么对象?由于如下原因,我们无法复用element对象:
此node对象,需要关联其对应的dom对象,但elements树应该是不可变的 无法支持Component,因为每个Component都有自己的state对象 引入React的新概念:Instances。此Instances就表示这个Virtual Dom Tree,其中instance表示已经render到dom的对象。定义如下:
1 instance = {element, dom, childInstances};
每个element,每个Dom节点都对应一个instance对象,我们的目标是尽可能的减少此instances的创建与销毁。
Element,Instances,Dom的关系图:
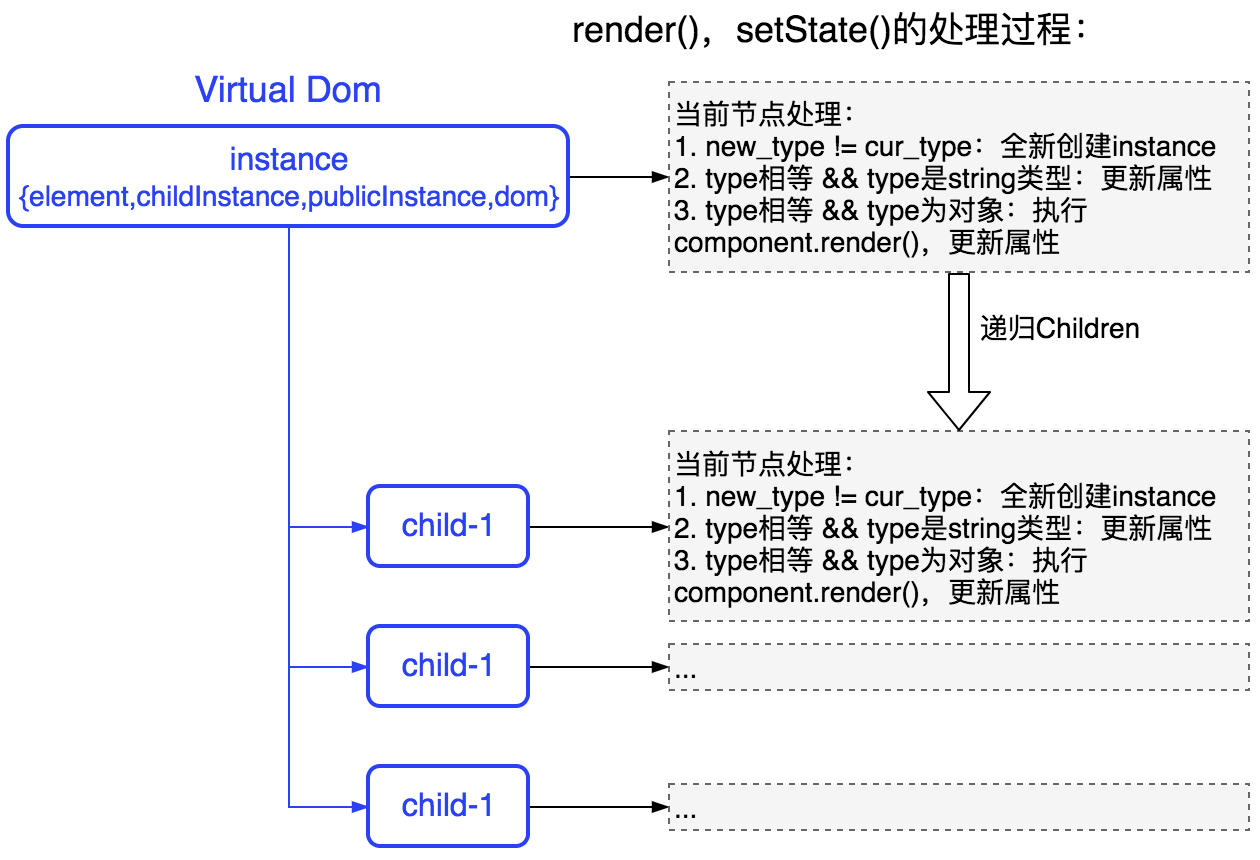
Component的setState()更新:
1
2
3
4
5
6
7
8
9
10
11
12
13
14
15
16
17
18
19
20
21
22
23
24
25
26
import { reconcile } from "./reconciler" ;export class Component { constructor (props ) { this .props = props; this .state = this .state || {}; } setState (partialState ) { this .state = Object .assign ({}, this .state , partialState); updateInstance (this .__internalInstance ); } } function updateInstance (internalInstance ) { const parentDom = internalInstance.dom .parentNode ; const element = internalInstance.element ; reconcile (parentDom, internalInstance, element); } export function createPublicInstance (element, internalInstance ) { const { type, props } = element; const publicInstance = new type (props); publicInstance.__internalInstance = internalInstance; return publicInstance; }
render的核心代码:
1
2
3
4
5
6
7
8
9
10
11
12
13
14
15
16
17
18
19
20
21
22
23
24
25
26
27
28
29
30
31
32
33
34
35
36
37
38
39
40
41
42
43
44
45
46
47
48
49
50
51
52
53
54
55
56
57
58
59
60
61
62
63
64
65
66
67
68
69
70
71
72
73
74
75
76
77
78
79
80
81
82
83
84
85
86
87
88
89
let rootInstance = null ;export function render (element, container ) { const prevInstance = rootInstance; const nextInstance = reconcile (container, prevInstance, element); rootInstance = nextInstance; } export function reconcile (parentDom, instance, element ) { if (instance == null ) { const newInstance = instantiate (element); parentDom.appendChild (newInstance.dom ); return newInstance; } else if (element == null ) { parentDom.removeChild (instance.dom ); return null ; } else if (instance.element .type !== element.type ) { const newInstance = instantiate (element); parentDom.replaceChild (newInstance.dom , instance.dom ); return newInstance; } else if (typeof element.type === "string" ) { updateDomProperties (instance.dom , instance.element .props , element.props ); instance.childInstances = reconcileChildren (instance, element); instance.element = element; return instance; } else { instance.publicInstance .props = element.props ; const childElement = instance.publicInstance .render (); const oldChildInstance = instance.childInstance ; const childInstance = reconcile (parentDom, oldChildInstance, childElement); instance.dom = childInstance.dom ; instance.childInstance = childInstance; instance.element = element; return instance; } } function reconcileChildren (instance, element ) { const dom = instance.dom ; const childInstances = instance.childInstances ; const nextChildElements = element.props .children || []; const newChildInstances = []; const count = Math .max (childInstances.length , nextChildElements.length ); for (let i = 0 ; i < count; i++) { const childInstance = childInstances[i]; const childElement = nextChildElements[i]; const newChildInstance = reconcile (dom, childInstance, childElement); newChildInstances.push (newChildInstance); } return newChildInstances.filter (instance =>null ); } function instantiate (element ) { const { type, props } = element; const isDomElement = typeof type === "string" ; if (isDomElement) { const isTextElement = type === TEXT_ELEMENT ; const dom = isTextElement ? document .createTextNode ("" ) : document .createElement (type); updateDomProperties (dom, [], props); const childElements = props.children || []; const childInstances = childElements.map (instantiate); const childDoms = childInstances.map (childInstance =>dom ); childDoms.forEach (childDom =>appendChild (childDom)); const instance = { dom, element, childInstances }; return instance; } else { const instance = {}; const publicInstance = createPublicInstance (element, instance); const childElement = publicInstance.render (); const childInstance = instantiate (childElement); const dom = childInstance.dom ; Object .assign (instance, { dom, element, childInstance, publicInstance }); return instance; } }
diyreact的reconciliation算法比较简单,只有当position与type都相同的情况下,才复用此instance,更新其内部的属性
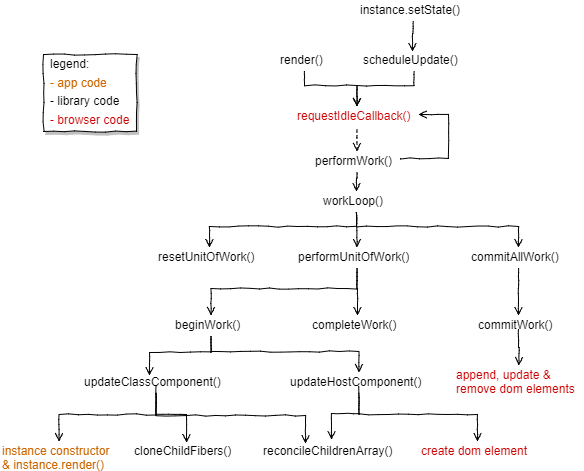
Fiber 上述的reconciliation算法是一个递归算法,当节点数量很大时,整体执行时间比较慢,会一直占用浏览器的main thread,导致动画出现卡顿和用户操作响应不及时。卡顿的理解与Android的卡顿理解是一至的,当一次render()或setState(),触发的reconcile()过程,超过16ms时,就会出现丢帧现象。卡顿demo ,如下图所示:
要解决卡顿问题,主要是解决上述的递归调用问题,让递归调用可以被中断,优先去处理animation和UI responsive。
React在16.x.x的解决方案是:把上述的执行过程拆分为很多的工作单元(UnitOfWork),这些很小的工作单元都能在很短的时间内执行完成,同时每两个执工作单元之间可以被中断,让main thread执行更高优先级的任务,如animation,ui responsive。
在DiyReact里的UnitOfWork就是包括当前节点的处理工作:
new_type != cur_type:全新创建instance type相等 && type是string类型:更新属性 type相等 && type为对象:执行component.render(),更新属性 如果知道当前main thread需要执行更高优先级任务了?利用requestIdleCallback-后台任务调度 就可以了解当前main thread是否处于空闲时间,其调用代码:
1
2
3
4
5
6
7
8
9
10
11
render ( updateQueue.push (...); window .requestIdleCallback (performWork); } function performWork (deadline ) { while (nextUnitOfWork && deadline.timeRemaining () > ENOUGH_TIME ){ nextUnitOfWork = performUnitOfWork (nextUnitOfWork); } }
通过deadline.timeRemaining()函数即可知道当前还剩多少idle时间。
要实现这套新的工作单元调度,instance tree的节点instance的结构会要发生变化,如下所示:
1
2
3
4
5
6
7
8
9
10
11
12
13
14
15
16
{ tag :HOST_COMPONENT |CLASS_COMPONENT , type :"div" |Component , parent : parentFiber, child : childFiber, sibling :null , alternate : other fiber tree, stateNode :dom|component, props : element.props , partialState : component changed state, effectTag :PLACEMENT , effects : [] };
这颗新的树的结点有一个新的名称:Fiber。这个颗也被称为Fiber Tree。
fiber tree的结构:
每两个工作单元之间,可以被更高优先级的任务中断,那就无法使用一颗Fiber Tree,即对应当前的Dom,又进行更新操作。通过上面的alternate可知,有两颗相互关联的Fiber Tree:
current tree:与当前的Dom对应,其内容已经渲染到Dom上 work-in-progress:由render()或setState()触发的构建树 方法的调用队列:
更多代码细节,请学习:Didact Fiber: Incremental reconciliation
发布 在React的最新版本里,打包工具从webpack,改为rollup。
webpack与rollup基本相同,记住如下差异点:
webpack支持code-splitting,同时支持按需加载 Rollup默认基于ES2015模块,把所有的资源放在一起,一次性加载 如何选择?结论:
针对app级别的应该使用Webpack,针对js库级别的应用应该使用Rollup。
更多请参考:Webpack、Rollup相爱相杀的那些事
rollup由于默认基于ES2015模块与语法,而整体DiyReact也是基于ES6开发的,所以配置很简单:
1
2
3
"scripts" : { "build:main" : "rollup src/diyreact.js -f umd -n diyreact -o dist/diyreact.umd.js" }
具体参数的含义请参考:Command line flags Type of output (amd, cjs, esm, iife, umd)的理解:iife: 立即执行函数 cjs: 遵循CommonJs Module规范的文件输出 amd: 遵循AMD Module规范的文件输出 umd: 支持外链/CommonJs Module/AMD Module规范的文件输出 esm: 将多个遵循ES6 Module的文件编译成1个ES6 Module 在不同场景下的使用情况:1 2 3 4 5 6 7 8 $ rollup main.js --file bundle.js --format iife $ rollup main.js --file bundle.js --format cjs $ rollup main.js --file bundle.js --format umd --name "myBundle"
发布测试 为了方便测试生成后的diyreact.js文件,使用的是babel-standalone@6库,在browser下直接运行ES6语法,如下所示:
1 2 3 4 5 6 7 8 9 10 11 12 13 14 15 16 17 18 19 20 21 22 23 24 25 26 27 28 29 30 31 32 33 34 35 36 37 38 39 40 41 42 43 44 45 46 47 48 49 50 51 52 53 54 55 56 57 58 59 60 61 62 <html> <head> <script src="https://unpkg.com/babel-standalone@6/babel.min.js"></script> <script src="../dist/diyreact.umd.js" type="text/javascript"></script> </head> <body> <div id="root"></div> <script type="text/babel" data-plugins="transform-react-jsx" data-presets="es2017,stage-3"> /** @jsx diyreact.createElement **/ const studies = [ { name: "DiyReact的功能", url: "https://handsomeliuyang.github.io/" }, { name: "createElement与JSX", url: "https://handsomeliuyang.github.io/" }, { name: "Instance,reconciliation与Virtual Dom", url: "https://handsomeliuyang.github.io/" }, { name: "Component and State", url: "https://handsomeliuyang.github.io/" }, { name: "Fiber", url: "https://handsomeliuyang.github.io/" } ]; class App extends diyreact.Component { render() { return ( <div> <h1>DiyReact的学习过程</h1> <ul> { this.props.studies.map(study => { return <Study name={study.name} url={study.url}/>; }) } </ul> </div> ); } } class Study extends diyreact.Component { constructor(props) { super(props); this.state = { likes: Math.ceil(Math.random() * 100) }; } like() { this.setState({ likes: this.state.likes + 1 }); } render() { const { name, url } = this.props; const { likes } = this.state; const likesElement = <span />; return ( <li> <button onClick={e => this.like()}>赞:{likes}️</button> <a href={url}>{name}</a> </li> ); } } diyreact.render(<App studies={studies} />, document.getElementById("root")); </script> </body> </html>
注意:
babel-standalone的配置API很少,可以查看其源码:https://github.com/babel/babel-standalone/blob/master/src/index.js babel-standalone不支持env preset,只有es2015, es2016, es2017等等presets,为了支持new Class语法,需要使用es2017 踩过的坑 单元测试 单元测试必要性这里就不叙述了,选择的是ava单元测试框架,使用过程中的一些问题:
es6语法,jsx语法默认不支持?1 2 3 4 5 6 7 8 9 10 11 12 13 14 15 16 17 18 19 20 21 22 "ava" : { "require" : "babel-register" , "babel" : "inherit" }, "babel" : { "plugins" : [ [ "transform-react-jsx" , {} ] ], "presets" : [ [ "env" , { "targets" : { "node" : "current" } } ] ] }
没有browser相关的环境与Api?1 2 3 4 5 6 7 8 9 10 11 import browserEnv from 'browser-env' ;browserEnv (['document' ]);test.beforeEach (t => let root = document .getElementById ("root" ); if (!root){ root = document .createElement ("div" ); root.id = "root" ; document .body .appendChild (root); } t.context .root = root; });
browser-env库没有window.requestIdleCallback等Api?1 2 3 4 5 6 7 8 window .requestIdleCallback = function (task ){ function timeRemaining ( return 2 ; } task ({ timeRemaining : timeRemaining }); };
ava单元测试如何debug? babel的一些概念理解:babel-register?babel-standalone@6?plugin与preset的区别?babel的编译过程:parser:通过 babylon 解析成 AST transform[s]:All the plugins/presets ,进一步的做语法等自定义的转译,仍然是 AST。 generator: 最后通过 babel-generator 生成 output string。 plugins与presets的区别:presets是一个plugin的集合,如babel-preset-env,根据当前的运行环境,确定需要的plugin组合 babel-register:require(‘babel-register’)后,所以require()其他模块时,就会进行文件编译,这个比较适合开发期间使用 babel-standalone@6:在browser上,对js代码实现在线转换,要完全支持React,需要配置对应的plugins和presets,如下所示:1 2 3 4 5 6 7 8 9 10 11 <html > <head > <script src ="https://unpkg.com/babel-standalone@6/babel.min.js" > </script > </head > <body > <div id ="root" > </div > <script type ="text/babel" data-plugins ="transform-react-jsx" data-presets ="es2017,stage-3" > </script > </body > </html >
CommonJS与ES6模块的区别?ES6模块 和 CommonJS 的区别 本篇文章的code:diyreact
参考 Didact: a DIY guide to build your own React React Components, Elements, and Instances React Fiber Architecture requestIdleCallback-后台任务调度 babel的关键概念理解